


")


Every time I talk to someone about export presets they look at me like I have five heads! No one seems to know what they are and if you’re one of them, you’re in for a treat today and this is a CRUCIAL step to saving time with your wedding workflow, so do not put this off! Today I’m going to walk you through step by step how to create export presets in Lightroom. If you prefer to learn through video, I created a short tutorial below!
Presets in general are designed to save you time – whether it’s an export preset or an editing preset, these little Lightroom tools are golden. However, not all presets are created equal. The way you export a preset for print vs. how you export for Facebook is very different. That’s what I will be explaining in this post. Export presets are great because they automate steps you do every single time in your workflow. In the case of exporting, we’re going to be automating your settings such as pixel width, DPI, quality, etc.
Sounds great. So how do you make an export preset?
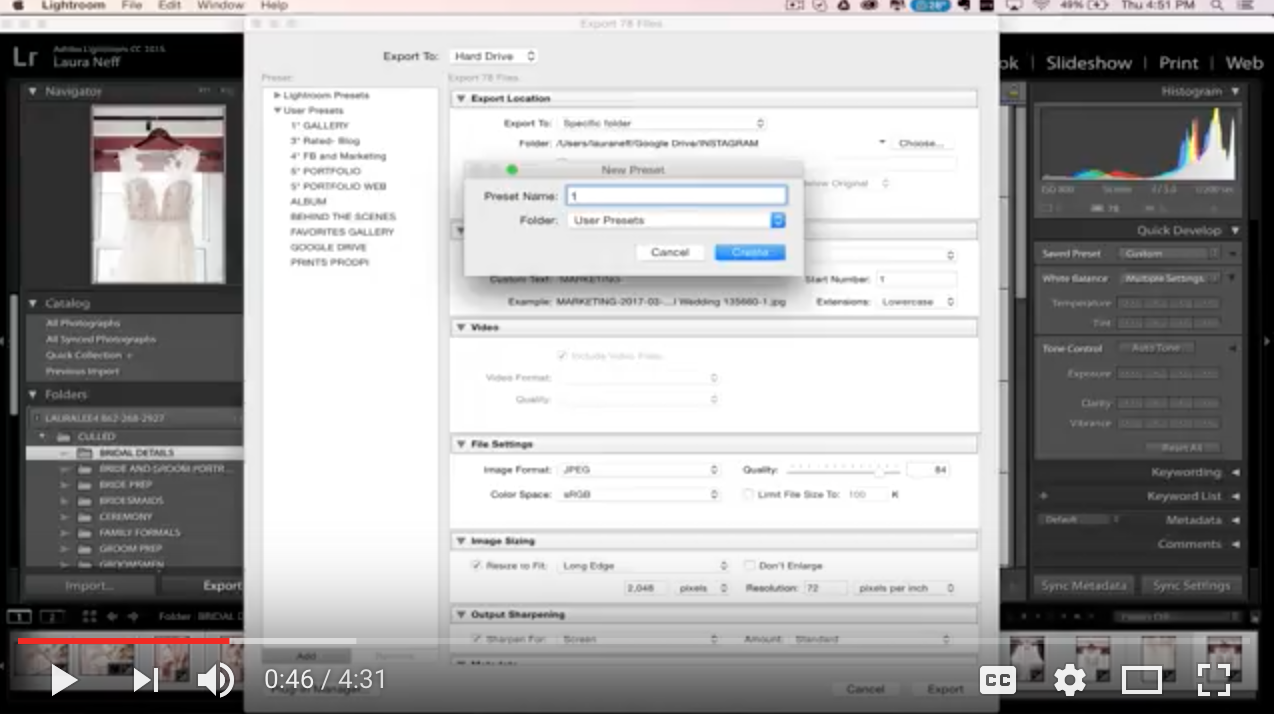
Step 1. Open the Export Dialog box within Lightroom.
Do this by either hitting the big export button on the bottom left of your Lightroom window or going to File –>→ Export. Your dialog box will pop up within Lightroom..

Step 2. Add all the settings you need!
This part is easy. And to make it even easier, I saved you the liberty of figuring out what you need and created a free guide you can download below. For most of them, you will be choosing to export to “choose folder later”. By doing so, every time you click export, you will simply pick the preset you want to use and then choose your custom destination folder.
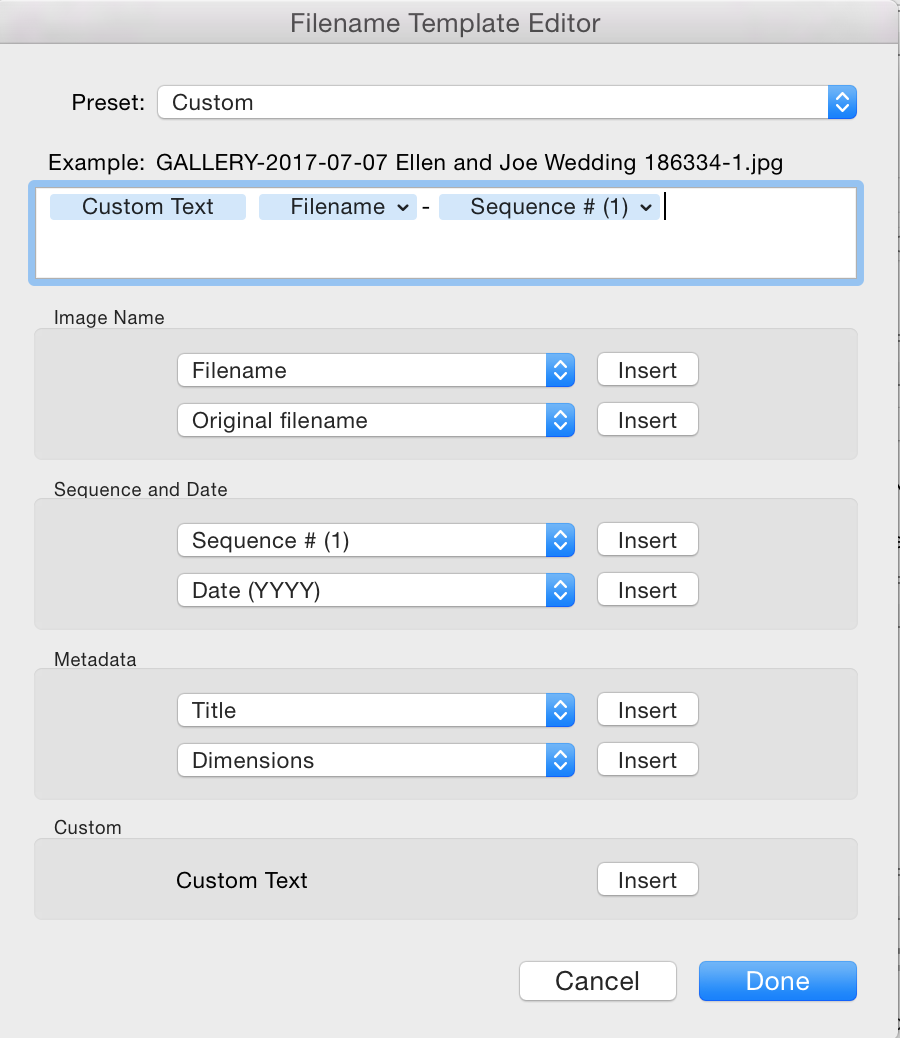
Step 3. Do all your custom naming sequencing!
The screenshot below shows the window that you open to create the custom file names for your presets. Just choose what “fields” you want (aka “Custom Text”, “Filename” and “Sequence # (1)” and hit insert for each one respectively. If you mess up the order you can just click and drag the blue highlighted boxes into the order you want. It should look like this when you’re done.
Step 4. Once you’ve added all the settings for one of these presets below, click “Add” on the left side of the dialog box. This will pop up with a new box asking you to name the preset. I wrote my suggested names for each one on the next few pages. Once you hit add, this preset will be available to you indefinitely every time you use Lightroom. You will no longer have to change your settings every time you’re ready to export a gallery!
For a wedding workflow, you will be creating the 6-7 presets.
There will be presets for a “Favorites Gallery” which will be used for the blog, the “Main Gallery” which is everything you deliver to the Client, a “Facebook Gallery” which will be used to create a Facebook album of images, an “Album” preset which will include all the images you use for the album design, a “Portfolio” preset which will be exporting to a Desktop folder that holds ALL your portfolio images for the year so you have easy access to your best work, and lastly, a “Behind the Scenes” preset which will also export to your Desktop to a “Behind the Scenes” folder for when you want to post shots like this on your blog for the popular year end behind the scenes post or to social media!
*A QUICK NOTE ON FILE SIZE
If you use PASS for your online galleries, they automatically reduce the long edge of your images to be 4000px. My export presets are set to export at 6000px on the long edge because I deliver 10” x 10” albums which are 6000px across a double spread.
Since I export my “favorites” into Pixieset and use these for the album design, I want them to be 6000px wide so I can easily download and load them right into my album software. The same goes for the file size for the Main Gallery. If my clients are selecting their own “favorites” to add into the album, I want to individually download them right from their gallery to drop them into the album so I don’t need to go into Lightroom, re-export the images and then upload to the album software. Making them 6000px right from the get go saves that extra step of re-exporting.
However, the only reason I’d need an image to be 6000 px is if it’s going to be a full double page spread. Pixieset does not reduce file size upon upload.
*A QUICK NOTE ON SHARPENING IMAGES
I sharpen my images in Lightroom (by around 35 percent maybe and then sharpen on export as well. You should ALWAYS be sharpening on export. When you are upsizing or downsizing or printing your images, there is automatically sharpness lost in the output process from Lightroom to the final image (whether JPEG or print). Sharpening on your export as well makes up for this loss. (That isn’t to say your images are blurry if you don’t sharpen them- it’s just an added layer of crispness!)
And that’s it! Imagine if doing this one time for maybe 15 minutes could save you hundreds and hundreds of hours down the road in your career.
If you’ve missed the previous post (HOW TO SAVE TIME ON EVERY PHOTO SESSION | WEDDING PHOTOGRAPHY WORKFLOW SERIES #3 ), click here to catch up!


")


[…] previous post (HOW TO CREATE EXPORT PRESETS IN LIGHTROOM | PHOTOGRAPHY WORKFLOW SERIES #4), click here to catch […]
[…] To read about how to set up export presets, and grab my free guide on what settings to use, read this post: How to Create Export Presets in Lightroom […]
[…] How to Create Export Presets in Lightroom […]
Ah, darn I wish these export settings were still available for download! I just stumbled upon your page and have been deep-diving into all of your blog posts. Amazing work!